How to Measure Garden Hose GPM With a Bucket (Simple Method)
How can I measure my garden hose's gallons per minute with a bucket? It's a question a lot of homeowners ask when their sprinklers seem weak or their hose just doesn't feel as powerful as it used to. The answer is simpler than you might think: grab a standard five-gallon bucket, time how fast it fills, and do a bit of quick math.
As of 2026, most residential garden hoses deliver between five and seventeen gallons per minute, depending on diameter and your home's water pressure. A quick bucket test takes under three minutes and can help you diagnose issues before you start shopping for a new hose. Here's exactly how to do it right.
Why You Should Know Your Hose's Flow Rate
Low flow through a garden hose is one of those problems that sneaks up on you. One day you're watering the garden, and the next the spray feels like a sad trickle. Before you jump to conclusions or replace the hose, knowing your actual GPM tells you whether the problem is the hose, the pressure, or something else entirely.
Per research from university extension services on outdoor water use, a typical 5/8-inch hose at 60 PSI pushes around fourteen gallons per minute. That number drops significantly if the hose is longer, kinked, or if your home's incoming water pressure is on the lower side.
Understanding your flow rate helps you make smarter decisions. It affects whether a soaker hose will actually saturate a bed, if a spray nozzle will clean your driveway efficiently, and whether you're wasting time waiting for a kiddie pool to fill. If you're experiencing weak output, diagnosing low flow through your hose is a logical next step.
The bucket test gives you a baseline before you invest in accessories or call a plumber.
The Bucket Test in Two Minutes
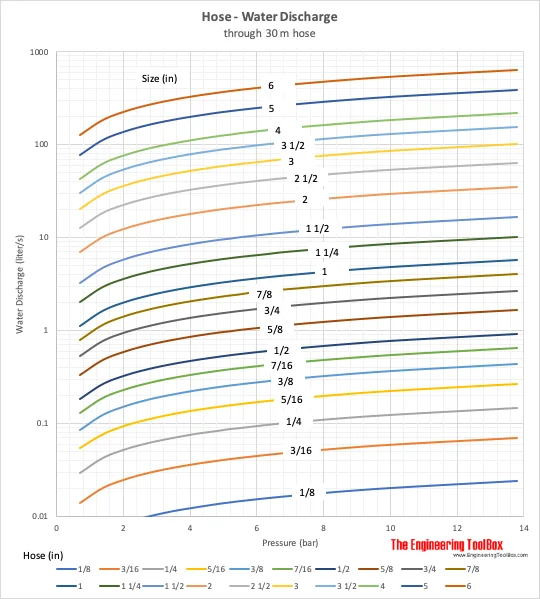
The bucket test is exactly what it sounds like: you fill a bucket with water from your hose, time the process, and calculate the result. It's not scientific lab work, but it's accurate enough for real-world decisions.
Here's what you need:
- A bucket with volume markings (a standard five-gallon bucket works perfectly)
- A stopwatch or your phone timer
- Your garden hose attached to an outdoor faucet
The formula is straightforward. Divide the number of gallons collected by the seconds it took, then multiply by sixty to get your gallons per minute. For example, if a five-gallon bucket fills in twenty seconds, that's five divided by twenty equals zero point twenty-five, times sixty, which gives you twelve GPM.
Most people underestimate how variable household water pressure can be. Testing with a bucket removes the guesswork and gives you a number you can actually trust instead of relying on what the hose label claims.
Step-by-Step: How to Run the Bucket Test Correctly
Running an accurate bucket test comes down to timing and consistency. Mess up the timing and your numbers are useless. Follow these steps and you'll get a reliable reading every time.
Step One: Prepare Your Setup
Make sure the hose is fully uncoiled and lying flat. Kinks and tight coils restrict flow and will give you a falsely low reading. Check that the nozzle is set to full open and the faucet is turned all the way on.
Step Two: Run Water First
Turn the water on and let it run for about five to ten seconds before you start timing. This clears out any stagnant water and lets the flow stabilize so you're measuring steady-state performance, not a startup spike.
Step Three: Time the Fill
Position the bucket directly under the hose outlet. Move the hose into the bucket and start your timer at the exact same moment water hits the bucket. Let it fill to your chosen mark.
A five-gallon line on a standard bucket is ideal. Keep your eyes on the water level, not the timer, and stop the clock the instant the water reaches the line.
Step Four: Repeat for Accuracy
Run the test two or three more times. Flow can vary slightly depending on how you position the hose or minor pressure shifts. Average your results for a number you can actually rely on.
Step Five: Calculate Your GPM
Use this formula: gallons collected divided by seconds elapsed, multiplied by sixty. If you collected four gallons in eighteen seconds, that's four divided by eighteen equals approximately zero point two two, times sixty, giving you about thirteen point two GPM.
If you want to explore ways to improve a low reading, here's how you can increase water pressure from your garden hose.
Understanding Your Results
A number on paper means something only when you know what to compare it to. Once you've calculated your GPM, here's how to interpret it.
Typical garden hose flow rates fall into three broad ranges based on diameter and pressure:
| Hose Diameter | Expected GPM at 60 PSI |
|---|---|
| 1⁄2 inch | 7 to 10 GPM |
| 5/8 inch | 10 to 15 GPM |
| 3/4 inch | 15 to 22 GPM |
These figures come from manufacturer specifications and plumbing reference data. Your actual numbers may vary based on your home's incoming pressure.
If your test shows five GPM on a five-eighths-inch hose, something is likely restricting flow. A kink is the simplest explanation. But a severely restricted hose can also signal a partial blockage inside the lining or a faucet that isn't opening fully.
When you connect a sprayer to your setup, make sure you're following proper connection procedures to avoid flow loss at the joint.
Longer hoses lose pressure over distance. A hundred-foot hose will naturally deliver less flow than a twenty-five-foot hose, even if everything else is identical. If you're working with a longer run and your hose reel is slowing things down, that's worth checking before you assume the hose itself is the problem.
A reading above eighteen GPM on a standard residential hose usually points to higher-than-average municipal pressure. That's fine for flow speed but worth noting if you plan to run sensitive equipment like certain irrigation timers or misting systems.
Common Mistakes That Ruin Your Test
The bucket test is simple, which means it's also easy to mess up without realizing it. These mistakes are more common than you'd think.
Starting the timer too late or too early is the biggest culprit. If you turn on the hose and wait a second before placing the bucket, you've already lost some flow. Start the timer the instant water enters the bucket.
Stop it the instant the water hits your mark. No delays.
Using a bucket without clear volume lines throws off your measurement. A plain five-gallon bucket without markings forces you to estimate where "five gallons" actually is. Use a bucket with a visible fill line or fill to the rim and confirm it's actually a true five-gallon capacity.
Standard Home Depot or Krampena buckets are marked correctly. Most dollar-store buckets are not.
Not running multiple tests ignores normal variation. A single reading might look high or low just because of how you held the hose. Take at least three readings and average them.
It takes thirty extra seconds and makes the result far more trustworthy.
Testing with a partially closed nozzle defeats the purpose. If your goal is to know your hose's maximum output, the nozzle needs to be fully open. Partial closure is useful for everyday watering but skews your flow measurement.
Ignoring hose condition is another trap. An old, cracked, or internally degraded hose won't flow like it used to. If your numbers are surprisingly low and the hose looks worn, repairing a leak or replacing the hose might be the real fix rather than adjusting your expectations.
Environmental factors matter too. Testing in freezing temperatures can affect results since cold water is slightly denser and some fixtures throttle flow when cold. Testing right after the lawn has been watered all day can also mean your municipal pressure is temporarily lower due to neighborhood demand.
Keep your bucket level and positioned directly under the stream. Angling the hose causes splashing and water loss, which means you're not actually measuring the full flow. Every dropped gallon is a missed gallon that skews your math.
Frequently Asked Questions
Can I use any bucket, or does it have to be a 5-gallon one?
You can use any container, but a standard five-gallon bucket with clear volume markings is your best bet. Buckets without measurement lines force you to estimate the volume, which introduces error into your calculation. A marked bucket gives you a reliable reference point every time you run the test.
What's a normal GPM for a 5/8-inch garden hose?
A 5/8-inch garden hose typically delivers between 10 and 15 GPM at standard residential water pressure of 40 to 80 PSI. If your reading falls below 10 GPM, something is likely restricting flow. Common culprits include a kinked hose, a partially closed valve, or mineral buildup inside an older hose.
Does hose length really matter that much?
Yes, it does. Longer hoses create more friction loss inside the tubing, which steadily reduces flow rate from start to finish. A 100-foot hose will deliver noticeably less water than a 25-foot hose of the same diameter, even when both are connected to the same faucet at full pressure.
How do I fix low flow if my bucket test shows it?
Start by straightening the hose and making sure every connection is tight and fully open. Check the faucet valve for partial closure or internal buildup. If those steps don't help, troubleshooting your hose's pressure issues is the next move.
Should I test with the nozzle on or off?
Test with the nozzle attached and set to your normal watering position. A nozzle changes flow characteristics significantly, so testing without one gives you a number that doesn't reflect real-world use. Match your test setup to how you actually plan to use the hose.
How accurate is the bucket test compared to a flow meter?
The bucket test is sufficiently accurate for homeowner decisions but less precise than a dedicated inline flow meter. Flow meters capture real-time variations and peaks. The bucket test provides an average over the fill period, which covers most practical needs without extra cost.
When to Take Action on Low Flow
A low GPM reading isn't always an emergency, but it does warrant attention depending on what you're using the hose for. Here's how to decide whether to keep using your current setup or make a change.
If your flow rate is within the expected range for your hose diameter, keep using it as-is. The hose is performing normally, and any perceived weakness likely comes from nozzle selection or distance rather than a true flow problem.
If your flow rate is 30 percent or more below the expected range for your hose size, investigate further. Check for kinks, inspect connections, and verify that the faucet valve opens fully. If those steps don't help, the hose itself may be degraded internally and worth replacing.
Don't ignore a sudden drop in flow if it happened gradually over months. That pattern often points to mineral buildup inside the hose lining, especially in areas with hard water. Learn how to extend your hose's lifespan so you can catch issues before they become frustrating.
If your flow rate is consistently high, above 18 GPM on a standard residential hose, consider whether that extra volume is necessary. High flow wastes water and can damage sensitive plants or wash away soil. A flow-restriction nozzle or a simpler spray setting can bring usage back in line with what your garden actually needs.
The bucket test is a diagnostic tool, not a permanent solution. Use it to establish a baseline, spot problems early, and make informed choices about your outdoor water system. A few minutes of testing now can save you time, money, and water later.

Similar Posts